Integrating Kafka with Node.js
Apache Kafka is a popular open-source distributed event streaming platform that uses publish & subscribe mechanism to stream the records(data).

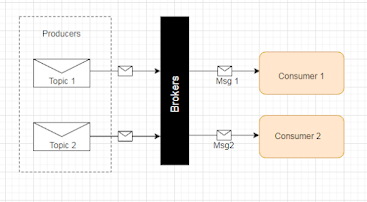
Kafka Terminologies
- Distributed system: Distributed system is a computing environment where various software components located on different machines (over multiple locations). All components coordinate together to get stuff done as one unit.
- Kafka Broker: Brokers are cluster of multiple servers. Message of each topic are split among the various brokers. Brokers handle all requests from clients to write and read events. A Kafka cluster is simply a collection of one or more Kafka brokers.
- Topics: A topic is a stream of "related" messages. Its unique throughout application. Kafka producers write messages to topics.
- Producer: Producer publishes data on the topics. A producer sends a message to a broker and the broker receives and stores messages.
- Consumers: Consumers read data from topics. A consumer connects to the broker, and requests the messages available on the stream.
- Consumer Group: In Kafka, a group of consumers identify themselves (using a configuration property) as belonging to the same group. In a consumer group, multiple consumers read from the same topic, but each consumer reads from exclusive partitions.
- Topic Partitions: This split of message streams is generally referred to as "partitioning". Topics in Kafka are partitioned, which is when we break a topic into multiple log files that can live on separate Kafka brokers.
- ZooKeeper is a centralized service that helps you coordinate and manage distributed applications.

Note: Single topic can be subscribed by multiple consumers.
Install KafkaJS using npm
npm install kafkajs
Setup KafkaJS client
Create a file called kafka.js:
const { Kafka } = require('kafkajs');
const kafka = new Kafka({
clientId: 'app1',
brokers: ['kafka1:9096', 'kafka2:9096'],
});
module.exports = kafka
Create a producer using our client:
const kafka = require('./kafka');
const producer = kafka.producer();
await producer.connect();
await producer.send({
topic: 'test-topic',
messages: [
{ value: 'Hello Apache Kafka!' },
],
})
await producer.disconnect()
Create a consumer to consume our message:
const kafka = require('./kafka')
const consumer = kafka.consumer({ groupId: 'consumerGroup' })
await consumer.connect()
await consumer.subscribe({ topic: 'test-topic', fromBeginning: true })
await consumer.run({
eachMessage: async ({ topic, partition, message }) => {
console.log({
value: message.value.toString(),
})
},
})
Mutilple Topic Subscribe to Consumer Group
const topicGroup1 = ["topic1","topic2"];
const consumer1 = kafka.consumer({groupId: 'consumer1', fromBegining:true});
const funConsumer1 = async () => {
await consumer1.connect();
await topicGroup1.forEach((topic) => {
consumer1.subscribe({topic:topic });
});
// we can also use
//await consumer1.subscribe({ topics: topicGroup1 })
await funConsumer1.run({
autoCommit: false,
eachMessage: async (task) => {
console.log(task);
await funConsumer1.commitOffsets([{topic: task.topic, offset : (Number(task.message.offset) +1).toString()}])
}
});
}
funConsumer1().catch((error) => {
console.error('Error running the consumer:', error);
});
Error Handling
consumer1.on('consumer.crash', async (payload) => {
try {
consumer1.disconnect();
} catch(error) {
console.log(error);
} finally {
setTimeout( async () => {
funConsumer1().catch((error) => {
console.error('Error running the consumer while crash:', error);
});
}, 5000);
}
});
This article clearly explains the importance of targeted advertising. Paid campaigns can significantly boost ROI when executed strategically. At Styl – Digital Marketing Solution, we design cost-effective PPC campaigns that maximize conversions and business growth. Very informative post!
ReplyDeleteStyl Digital Marketing